OAuth2
General information
For Microsoft OAuth2 configuration, see Appendix A.
ADITO provides three OAuth2 login types:
-
oauth2-authorizationcodeflow: Use this login type for delegated user access. It is primarily intended for web client logins, where users authenticate with the OAuth2 provider.
-
oauth2-token: Use this login type for access to REST webservices in ADITO. There is no web client login; an external application requests a token directly and passes it to ADITO in the request header. For more information, see the Web Services documentation.
-
oauth2-clientcredentials: This deprecated login type was formerly used for web services. It validates only whether a token can be generated with the configured
tenantId,clientId,clientSecret, andscope; it does not verify the tenant. It supports Microsoft providers only.
All login types require a separate Authentication Provider alias. The alias defines where to authenticate and how ADITO obtains the token.
Configure the Authentication Provider alias
- In the project tree, right-click the alias folder and select New.
- Enter a descriptive name, such as
oauth2-microsoft. - Select the Authentication Provider alias type.
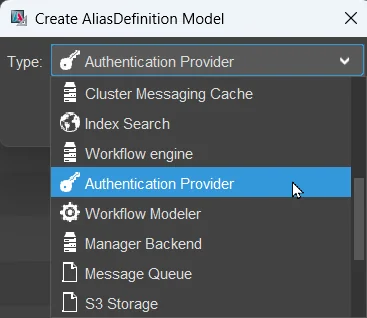 Figure: Select the Authentication Provider alias type.
Deploy the changes.
-
Double-click the system. The new alias is displayed in the Designer editor under
Data_alias,_*SYSTEMALIAS, and related aliases. -
Right-click the alias and select Create.
-
Select the alias and enter the authentication information in the property sheet. Obtain these values from the Microsoft Entra administrator who created the application.
Configure the following properties:
tenantId: The company ID.clientId: The application ID.clientSecret: The secret created for the application.scope: The requested permissions. The following examples apply only toMICROSOFT; the required scope depends on the use case and target interface.- For a client login, use a scope such as
https://outlook.office365.com/.default. - For web services, use
<clientId>/.default.
- For a client login, use a scope such as
If you are planning to use OpenId Connect for Access to the web client, use the scope openid.
This also ensures, that a signed JWT will be validated during login.
When an outgoing REST call uses auth.createConfigForOAuth2WithAlias(), a
scope set on the authentication config overrides the scope defined on the
alias. If the authentication config does not set a scope, ADITO uses the alias
scope as a fallback. If the REST call must not send a scope although the alias
defines one, set the scope explicitly to an empty string.
Configure the login list
Open the relevant login-list entry and configure its properties as follows:
| OAuth2 login type | Property key | Value |
|---|---|---|
| All | alias | The name of the Authentication Provider alias, for example MyAuthAlias. |
oauth2-authorizationcodeflow and oauth2-clientcredentials | oauth2 login domain (optional) | The domain of the client credentials, for example demo.onmicrosoft.com. If multiple Microsoft accounts are available, this domain is preselected and only matching-domain users can sign in. |
oauth2-authorizationcodeflow and oauth2-clientcredentials | oauth2 user template (optional) | The user login template for OAuth2 authentication. |
For the examples in this document, use a .onmicrosoft.com login address. You can instead use your regular domain.
oauth2-token
Use oauth2-token primarily for web services. It expects a token in the Authorization header with the Bearer scheme.
Its configuration is analogous to oauth2-authorizationcodeflow.
For Microsoft, the flow works as follows:
- A third-party application generates a Microsoft token with any supported flow.
- The application sends an HTTP request to ADITO with the token in the HTTP header.
- ADITO validates the JWT signature.
- For application tokens, for example from the Client Credentials flow, ADITO checks the JWT
tidclaim and usesjDitoWebserviceUser. - For user tokens, for example from the Password or Authorization Code flow, ADITO checks the JWT
upnclaim and identifies the user by UPN. Theoauth2 user templatecan also be used when required.
For third-party providers, ADITO executes the Authentication Provider alias's getUsernameFromAccessTokenProcess.
The process must identify the user from the JWT or through an API request.
Validate JWT signatures in this process when required. Until a signature is validated, its claims are untrusted user input.
Certificate authentication
Since ADITO version 2024.1.4, oauth2-token and oauth2-authorizationcodeflow can authenticate with a certificate.
This is currently supported for Microsoft only, not custom third-party configurations.
Create or request a certificate, upload it to the Microsoft Entra application, and provide ADITO with the certificate and its key. Add the certificate to the ADITO keystore.
 Figure: Add the certificate to the ADITO keystore.
For cloud systems, download the keystore from the file browser. Then use KeyStore Explorer to add the certificate.
 Figure: Add the certificate with KeyStore Explorer.
When configuring the Authentication Provider alias, set serverAuthMethod to CERTIFICATE.
Then configure certificateName, clientId, scope, and tenantId.
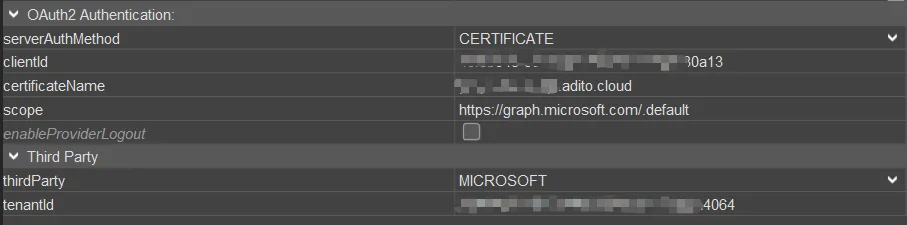 Figure: Certificate configuration for an Authentication Provider alias.
CUSTOM third-party providers
Set the provider value to CUSTOM for external OAuth2 providers other than Microsoft.
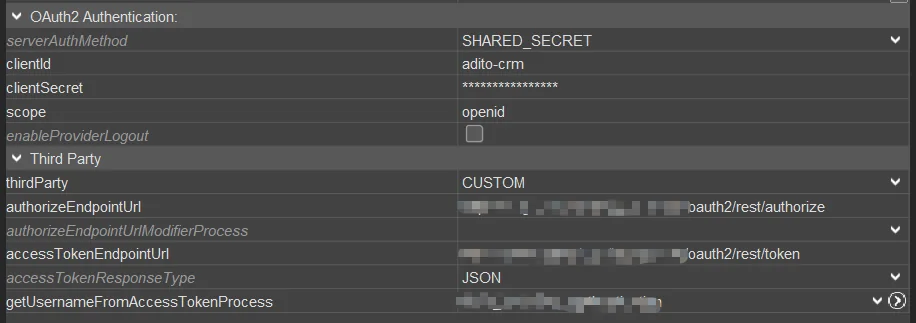 Figure: Custom OAuth2 provider configuration.
Configure clientId, clientSecret, and scope, then configure the following properties:
-
authorizeEndpointUrl: The provider endpoint that authorizes the user. ADITO redirects users to this URL. -
authorizeEndpointUrlModifierProcess(optional): A process that adjustsauthorizeEndpointUrlbefore ADITO calls the authorization endpoint. Use it to append URL parameters. The process must return a string that starts with&, for example&key=param.The process can access every value defined in the login type's login-list entry through its key without spaces.
Example:
https://[OAuth2Provider]/oauth2/v1/auth?[SystemGeneratedParameters][ThisProcessGeneratedParameters]For Azure, configure the domain hint in the login list. ADITO appends
domain_hint=[YOUR_DOMAIN]; otherwise, it forces account selection withprompt=select_account. -
accessTokenEndpointUrl: The provider endpoint that issues access tokens. -
accessTokenResponseType: Specifies whether the REST response returns the token in the JSON body or as a URL parameter. -
getUsernameFromAccessTokenProcess: An authentication process that runs after ADITO receives the access token and before it searches for the ADITO user. The process must return the identifier, such as an ID or name, of a user stored in the Designer. Select an available authentication process from the list; you cannot enter process code in this property.The process can validate the token when the OAuth2 provider supplies a validation service or logic. ADITO core validates only validity,
clientId, and scope.
getUsernameFromAccessTokenProcess is required. If it is not set, all login attempts fail.
Authentication processes
Authentication processes convert the token from a custom provider into a login name stored in ADITO. After deployment,
all authentication processes are available in the getUsernameFromAccessTokenProcess list of the Authentication Provider alias.
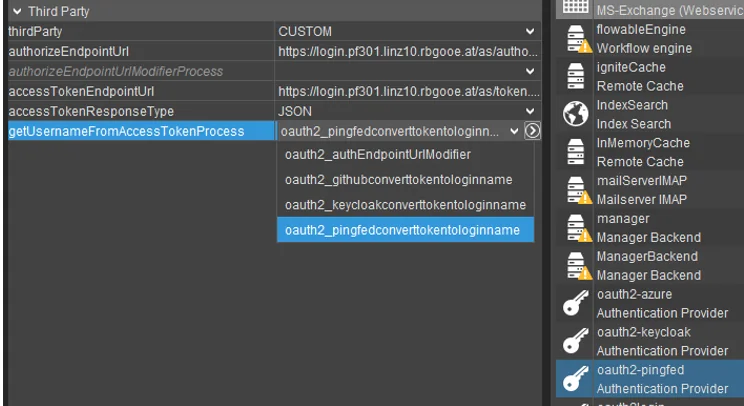 Figure: Select an authentication process for
 getUsernameFromAccessTokenProcess.
To create an authentication process:
- In the Projects window, right-click process and select New.
- Enter a descriptive name, such as
oauth2_asystemconverttokentologinname. - In the process property sheet, select
authenticationforvariants.
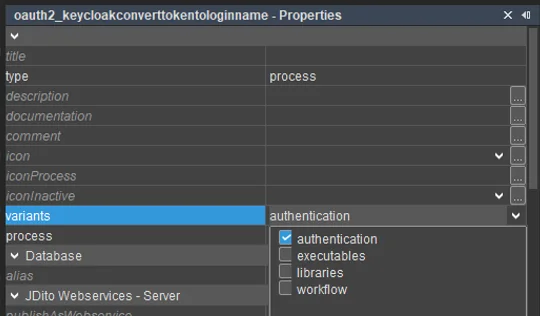 Figure: Select the
 authentication process variant.
Authentication processes are displayed as a group in the ADITO Designer.
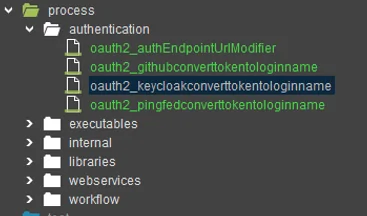 Figure: Authentication processes in the ADITO Designer.
The process can access these local variables:
token: The access token as a string.token_raw: The complete REST response from the third-party API, including the access token, ID token, and refresh token as JSON.
The response format and content differ between third-party providers. Some responses contain the user identifier directly; otherwise, retrieve it from the provider API with the access token.
The following examples show authentication processes for GitHub, Keycloak, PingFederate, and ADFS.
GitHub
    import { auth } from "@aditosoftware/jdito-types";
    import { net } from "@aditosoftware/jdito-types";
    import { util } from "@aditosoftware/jdito-types";
    import { vars } from "@aditosoftware/jdito-types";
    import { result } from "@aditosoftware/jdito-types";

    var token = vars.get("$local.token");

    var authConfig = auth.createConfigForNoAuth();
    var restConfig = net.createConfigForRestWebserviceCall()
            .actionType(net.GET)
            .url("https://api.github.com/user")
            .addHeader("Authorization", "token " + token)
            .addHeader("Accept", "application/vnd.github+json");

    var resultAsBase64 = net.callRestWebservice(restConfig, authConfig);
    var resultAsJsonString = util.decodeBase64String(resultAsBase64);
    var loginName = JSON.parse(resultAsJsonString).login;
    result.string(loginName);
Keycloak
    import { auth } from "@aditosoftware/jdito-types";
    import { net } from "@aditosoftware/jdito-types";
    import { util } from "@aditosoftware/jdito-types";
    import { vars } from "@aditosoftware/jdito-types";
    import { result } from "@aditosoftware/jdito-types";

    var token = vars.get("$local.token");

    var authConfig = auth.createConfigForNoAuth();
    var restConfig = net.createConfigForRestWebserviceCall()
            .actionType(net.GET)
            .url("http://localhost:8090/realms/oauthtest/protocol/openid-connect/userinfo")
            .addHeader("Authorization", "Bearer " + token);

    var resultAsBase64 = net.callRestWebservice(restConfig, authConfig);
    var resultAsJsonString = util.decodeBase64String(resultAsBase64);
    var userTitle = JSON.parse(resultAsJsonString).preferred_username;
    result.string(userTitle);
PingFederate
    import { auth, logging } from "@aditosoftware/jdito-types";
    import { net } from "@aditosoftware/jdito-types";
    import { util } from "@aditosoftware/jdito-types";
    import { vars } from "@aditosoftware/jdito-types";
    import { result } from "@aditosoftware/jdito-types";

    var token = vars.get("$local.token");

    var authConfig = auth.createConfigForNoAuth();
    var restConfig = net.createConfigForRestWebserviceCall()
            .actionType(net.GET)
            .url("https://????/idp/userinfo.openid")
            .addHeader("Authorization", "Bearer " + token);

    var resultAsBase64 = net.callRestWebservice(restConfig, authConfig);
    var resultAsJsonString = util.decodeBase64String(resultAsBase64);

    var loginName = JSON.parse(resultAsJsonString).Username;
    result.string(loginName);
ADFS
    import { util } from "@aditosoftware/jdito-types";
    import { vars } from "@aditosoftware/jdito-types";
    import { result } from "@aditosoftware/jdito-types";

    var tokens = JSON.parse(vars.get("$local.token_raw"));

    // Parse the ID token JSON.
    function parseJwt(token) {
        var base64Payload = token.split(".")[1];
        var payloadBuffer = util.decodeBase64String(base64Payload);
        return JSON.parse(payloadBuffer.toString());
    }

    // Use the login claim configured in ADFS.
    var upn = parseJwt(tokens.id_token).login;

    result.string(upn);
Token Validation for Custom Providers
It is important to validate the token before using it in order to ensure security.
Normally, this was supposed to happen in the getUsernameFromAccessTokenProcess as described above.
The name of the property didn't give a good enough indication that validation has to be done here.
That's why we introduced explicit parameters for the CUSTOM providers.
Property accessTokenValidationMode
There are three options that have to be applied depending on the custom provider and the configuration of the provider.
NONE: This is the default setting that you will see on your alias. We chose to have this default value to avoid breaking existing systems. It is really important to change this to one of the following values at least in production environments.
JWT:
This is to be used when a signed JWT is used as the access token.
Here the public key is downloaded automatically from the JWKS endpoint URL and used to validate the tokens.
Note that for the openid scope, this will always be done anyway.
PROCESS:
If you are receiving opaque access tokens from your authentication provider, you have to validate the tokens
by sending them to a predefined endpoint. This might be the userinfo_endpoint or the introspection endpoint,
which would be specified in the .well-known endpoint. As those endpoints are optional in OpenID Connect and OAuth2,
we can't provide automatic validation for custom providers. Therefore, an additional property,
validateAccessTokenProcess, is displayed; it is hidden when validation mode PROCESS is not selected.
The process that can be selected here must perform the validation.
The content of those processes will be pretty similar to the getUsernameFromAccessTokenProcess, except the server
expects a boolean value as a result.
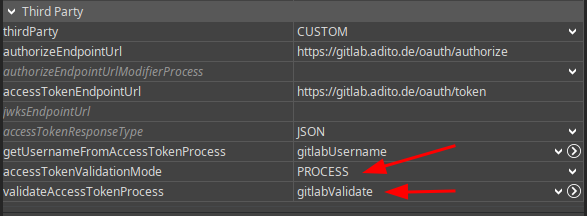
An example for Gitlab would be like this:
import { auth, logging } from "@aditosoftware/jdito-types";
import { net } from "@aditosoftware/jdito-types";
import { util } from "@aditosoftware/jdito-types";
import { vars } from "@aditosoftware/jdito-types";
import { result } from "@aditosoftware/jdito-types";

var token = vars.get("$local.token");

var authConfig = auth.createConfigForNoAuth();
var restConfig = net.createConfigForRestWebserviceCall()
        .actionType(net.GET)
        .url("https://gitlab.adito.de/api/v4/user")
        .addHeader("Authorization", "Bearer " + token);

var resultAsBase64 = net.callRestWebservice(restConfig, authConfig);
var resultAsJsonString = util.decodeBase64String(resultAsBase64);
var userTitle = JSON.parse(resultAsJsonString).preferred_username;

// here you might have some additional checks on the result of the webservice call

result.boolean(true);
Note that Gitlab is not recommended as an authentication provider for webservice calls.