Dashboard and Dashlet
After a user logs in to the client, or whenever the Home button is used, a Dashboard is shown. This default dashboard is called the Home Dashboard.
A Dashboard consists of one or more View-based components called Dashlets. The Dashlets button, available through the blue A button in the lower-right area of the Dashboard, opens the DashletStore. There, users can add Dashlets from categorized lists. To remove a Dashlet, click the x button in the upper-right corner of the Dashlet.
Add Dashlets
To make a specific View available as a Dashlet in the DashletStore, create a DashletConfiguration and assign it to the View. Open the View in the Navigator and choose Add Dashlet Config from the context menu.
This option is not available for Views that use MasterDetailLayout.
Enter the name of the DashletConfiguration according to the ADITO spelling guidelines, for example MyDashlet. The new configuration appears under the DashletConfigs node. Then configure its properties:
title: Title of the Dashlet shown in the client, for exampleMy title, specifically- in the DashletStore;
- in the title bar of the Dashlet, after it has been added to the Dashboard.
description: Description shown below the Dashlet title in the DashletStore.icon: Mandatory property. Every Dashlet requires an icon. If no icon is set, an error is shown.
The icon property is mandatory. Without it, the DashletStore does not work correctly.
-
fragment: The final part of the View URL after/client/when the View is opened through a Context rather than a Dashboard. For example, if the URL ishttps://myProject.dev.c2.adito.cloud/client/MyContext/filter, enterMyContext/filterto show the unfiltered View.
If you want to apply a filter, extend the fragment with?search=.... Configure and apply the filter in the FilterView, then copy the resulting URL fragment into propertyfragment, for example:
->

After logging out and back in, the Dashlet shows the filtered data directly on the Dashboard.
-
singleton: Defines whether the Dashlet can be added more than once. Iftrue, it can only be added once and then disappears from the category list. Iffalse, it can be added repeatedly. -
categories: Defines in which DashletStore category the Dashlet appears. Use the+button to add a category, for examplename = myCategoryandtitle = My Category. The title is shown in the DashletStore, while the name is only used internally.
After creating or changing Dashboards or Dashlets, users must log out and back in before the changes become visible in the DashletStore.
Configure Dashboard defaults
You may have noticed that in the "Projects" window, there is a node named "dashboard", including several Dashboards, e.g.
- "Home": This is the main Dashboard shown after logging in to the client or whenever you press the "Home" button. Never rename it.
- "SalesDashboard": This is a Dashboard showing figures of sales topics. In the Global Menu of the client, it appears like a Context: You can select it in the menu group "Sales".
The main properties of a Dashboard are:
title: Title of the Dashboard, to be visible in the client.icon: The icon of the Dashboard, visible to the left of the title.dashboardType:PRIVATE: The Dashboard's appearance is user-specific. Any changes (e.g., moving Dashlets) a user makes, are not visible for other users. Example: the "Home" Dashboard.PUBLIC:- All users see the same number of Dashlets.
- Every user can change the order of the Dashlets, i.e., move Dashlets or change their size, but not close them. These individual changes are not visible to other users.
- However:
important
If a PUBLIC Dashboard has its property "fixedDashlets" set to true, then Dashlets can only be changed by a user having one of the roles specified in the Dashboard's property "editRoles" (see below), and the position and the size of all Dashlets are the same for every user. (Note that property "fixedDashlets" has currently only an effect on PUBLIC Dashboards.)
editRoles: Roles of users who are entitled to edit the Dashboard (move Dashlets, add new Dashlets, close Dashlets etc.). If no role is assigned, every user can edit.
The Dashboard administrator (= a user having the role "INTERNAL_DASHBOARDSTOREADMIN") can publish, edit, and delete elements (DashletConfigurations) in the DashletStore.
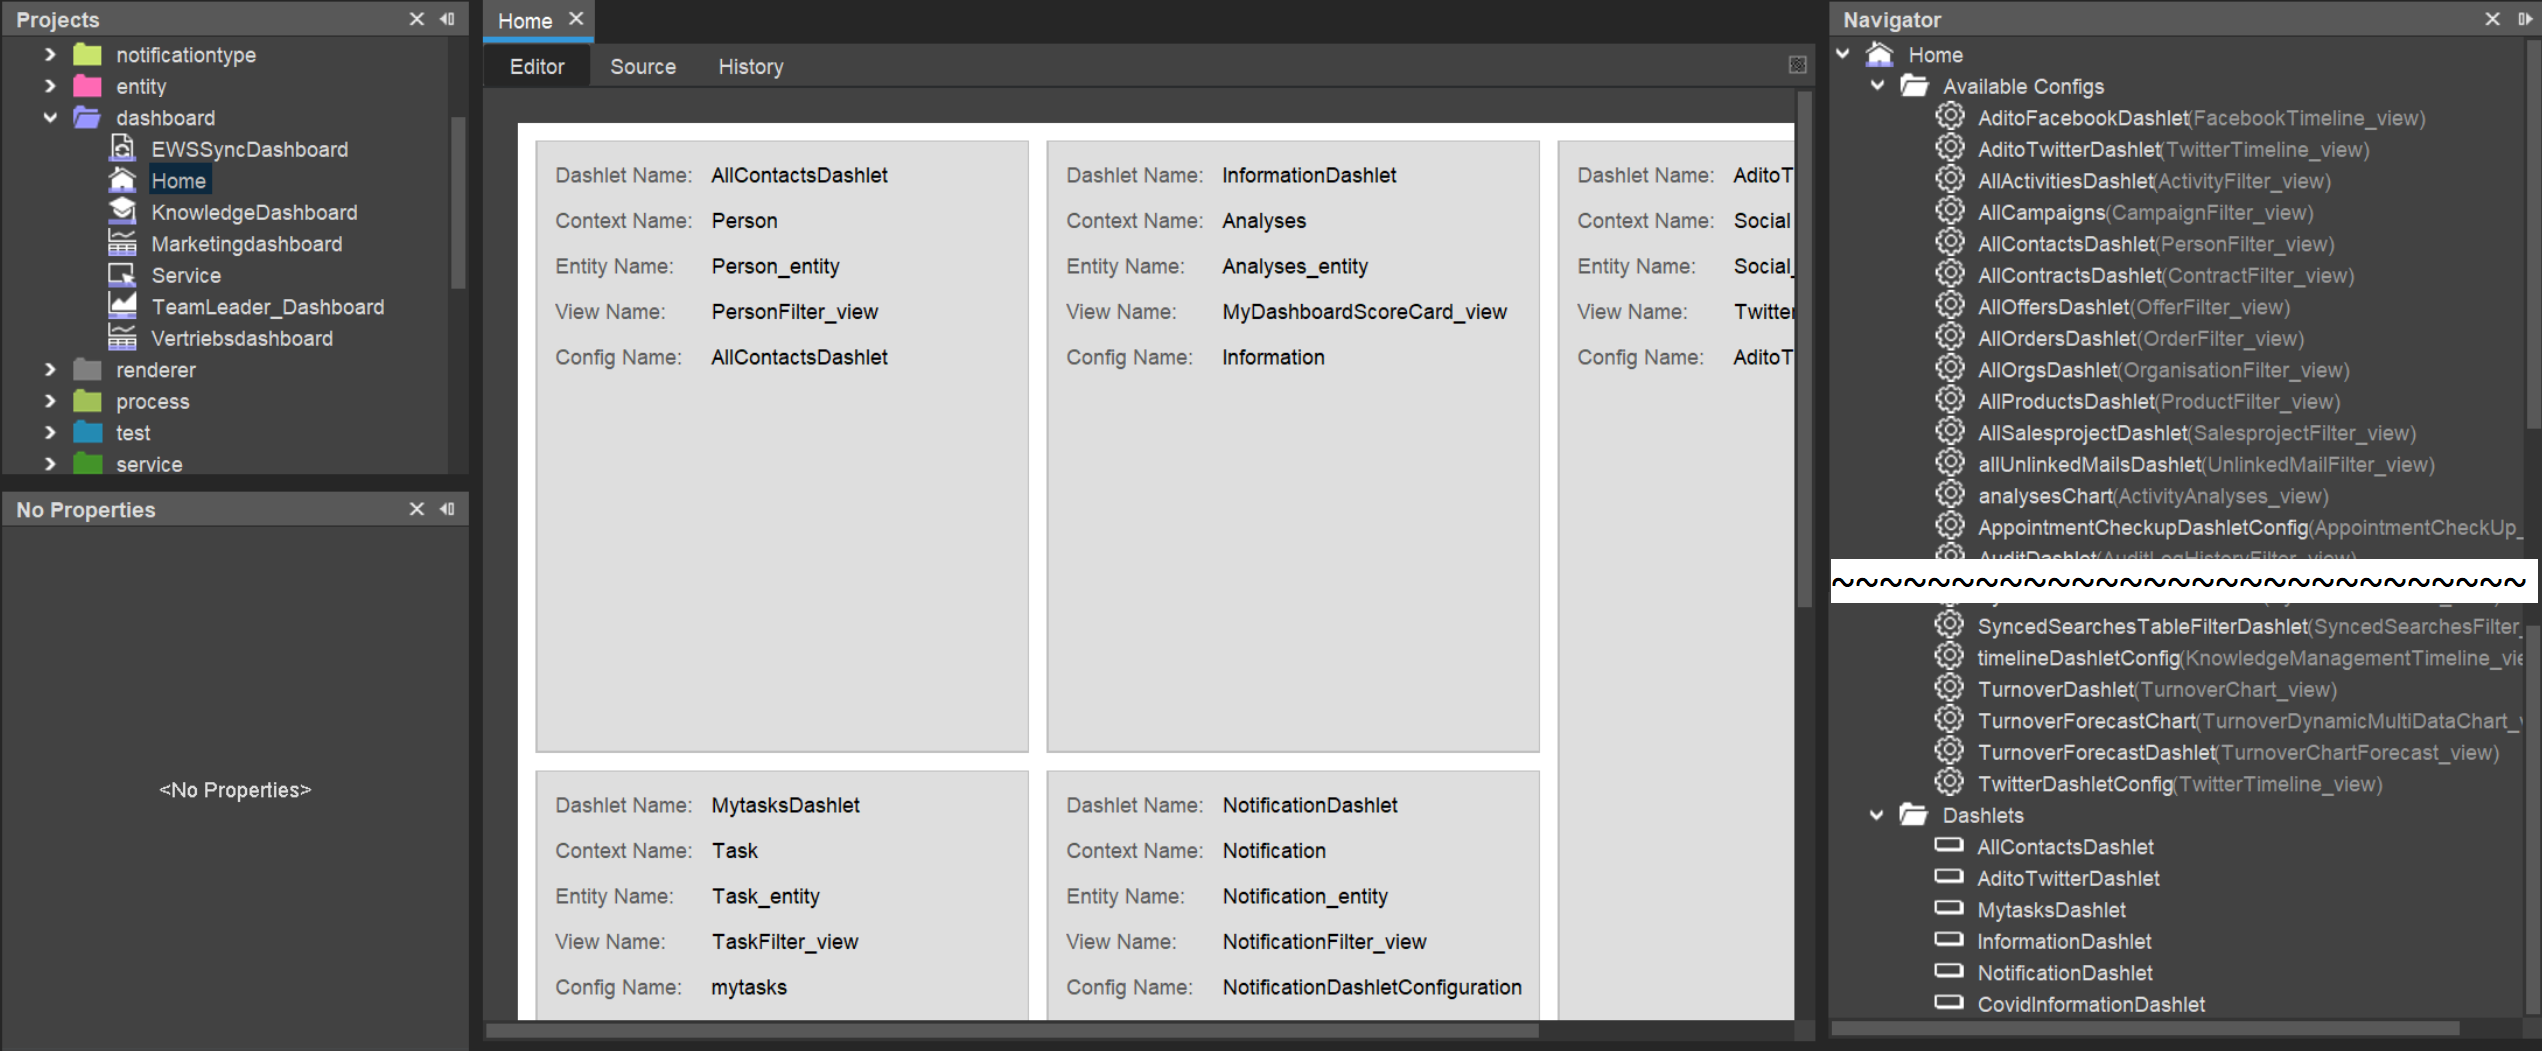
In the "Projects" window, double-click on a Dashboard to view its default configuration:
-
In the Editor window (upper middle window of the Designer) you can see a sketch of the arrangement of the default Dashlets, i.e., their size and position.
-
In the Navigator window (upper right window of the Designer) you can see 2 nodes:
- Under "Dashlets" you see the default Dashlets included in the selected Dashboard (if you click on one of it, it is marked with a surrounding blue line in the Editor). You can re-order and re-size them by changing their properties (which are based on an invisble grid of columns and rows)
xPos: the number of the column of the left upper corner of the DashletyPos: the number of the row of the left upper corner of the Dashletcolspan: the width of the Dashlet (= the number of rows it ranges over)rowspan: the height of the Dashlet (= the number of rows it ranges over)
- Under "Available Configs", you see all DashletConfigs of the project. To add a new Dashlet based on a specific DashletConfig, right-click on it and choose "Add to Dashboard".
- Under "Dashlets" you see the default Dashlets included in the selected Dashboard (if you click on one of it, it is marked with a surrounding blue line in the Editor). You can re-order and re-size them by changing their properties (which are based on an invisble grid of columns and rows)
 The configuration of the "Home" Dashboard
Be aware that the above configurations are only default settings. These are only applied,
- when starting the client for the first time and
- when a Dashboard is resetted (see below).
Whenever the user modifies the Dashboard in the client, the default settings visible in the Designer remain unchanged, of course.
According to the ADITO spelling guidelines (see ADITO Information Document AID001 Coding Guidelines, chapter "Spelling & Wording" > "ADITO models"), the name of a Dashlet starts with the name of the assigned DashletConfiguration, followed by the suffix "Dashlet", e.g. AllContactsDashlet.
Resetting Dashboards
If users want their Dashboard to be re-setted to its initial state (as configured in the Designer), the procedure is different depending on whether it is a "public" Dashboard or a "private" Dashboard:
Reset of a "public" Dashboard
To reset a "public" Dashboard (e.g., the "Sales Dashboard" of the ADITO xRM project), there are 2 ways:
- In the client: Remove all Dashlets manually.
- On database level: Remove all Dashlet datasets referring to the respective Dashboard, from the table ASYS_DASHLETS.
Afterwards, in both cases, re-open the Dashboard by choosing it from the Global Menu or clicking on its icon (pressing the "refresh" button of the browser is not enough). The Dashboard is now resetted.
Reset of a "private" Dashboard
To reset a "private" Dashboard (e.g., the "Home" Dashboard of the ADITO xRM project), there are 2 ways:
- In the client:
- Open the DashletStore (blue button "Dashlets").
- Click on the button
Reset Dashboard
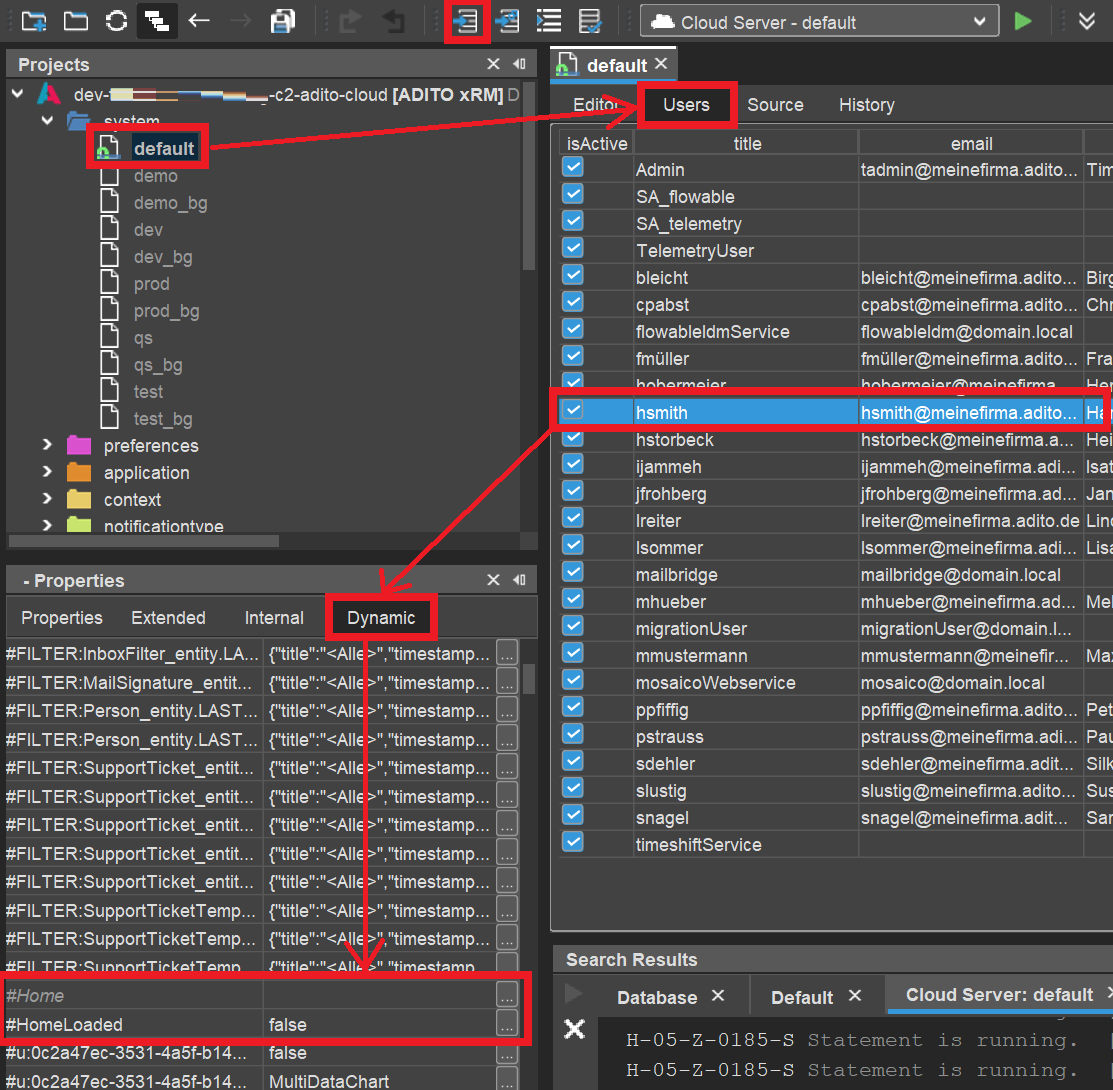
- In all other cases, a "private" Dashboard cannot be resetted in the client. In this case, you can reset a "private" Dashboard only in the Designer:
- Open the property sheet of the respective user in the Designer:
- In the "Projects" window, double-click on system > default
- In the Editor window, choose tab "Users"
- Click on the user whose Dashboard is to be resetted
- In the "Properties" window,
- choose tab "Dynamic" (this tab exists only for users who had logged-in at least once before); a key-value list appears.
- completely delete the content of the value field of key "#<name of Dashboard>", e.g., "#Home" for the "Home" Dashboard;
- set the value of key "#<name of Dashboard>Loaded" (e.g., "#HomeLoaded"), to "false" (type the word
falseas value).
- Click the "Save all" button in the button bar of the Designer
- In the client, log out and log in again, and re-open the Dashboard: The Dashboard is now resetted.
- Open the property sheet of the respective user in the Designer:
 Resetting the "private" Dashboard of a specific user
Creating new Dashboards
To create a new Dashboard, right-click on node "dashboard" in the Projects window and then choose "New" from the context menu. Enter the Dashboard's name, according to the ADITO spelling guidelines (see ADITO Information Document AID001 Coding Guidelines, chapter "Spelling & Wording" > "ADITO models"), e.g. "MyDashboard". Configure the Dashboard's properties (see previous chapter).
Now, add a Dashlet to the Dashboard form:
- In the Projects window, Double-click on your new Dashboard.
- In the Navigator window, search for your Dashlet under the node "Available Configs", e.g., "MyDashletName"
- Right-click on this Dashlet and choose "Add to Dashboard" from the context menu. In the Designer's Editor, the Dashlet now appears in the Dashboard form and in the Navigator window, under the node "Dashlets".
- In the Navigator window, rename the new Dashlet's default name, e.g., to "MyDashletNameDashlet" (right-click on it and choose "Rename" from the context menu).
- Configure the Dashlet's properties (see previous chapter).
If, in the Dashboard form, the second Dashlet is not visible after adding it, it has been added "under" the previous Dashlet. Then simply click on the second Dashlet in the Navigator window (under "Dashlets") and change its properties xPos/yPos; then it will change its position and be visible beside the first Dashlet.
Afterwards, in the "Projects" window, double-click on application > _____SYSTEM_APPLICATION_NEON to open the menu editor. Check "NeonDashboard" in the Navigator window, which will reduce the components visible in the middle window to only Dashboards names. Drag the new Dashboard and drop it on a suitable place in the Global Menu.
After deploying and logout/login you can open the new Dashboard via the Global Menu of the client.