Task 1: Create a new employee for a certain company
The following Workflow will create a new employee for a selected company. A welcome present (this will be displayed as a activity) will be sent. This process is about creating a new employee for a certain company and sending a welcome present to this person. Based on the gender of the person, the present will be different.
Overview
This step by step guide will show you how to create a Workflow from the Flowable Modeler to the implementation of the source code. The final result (together with Task 2) could look like this:
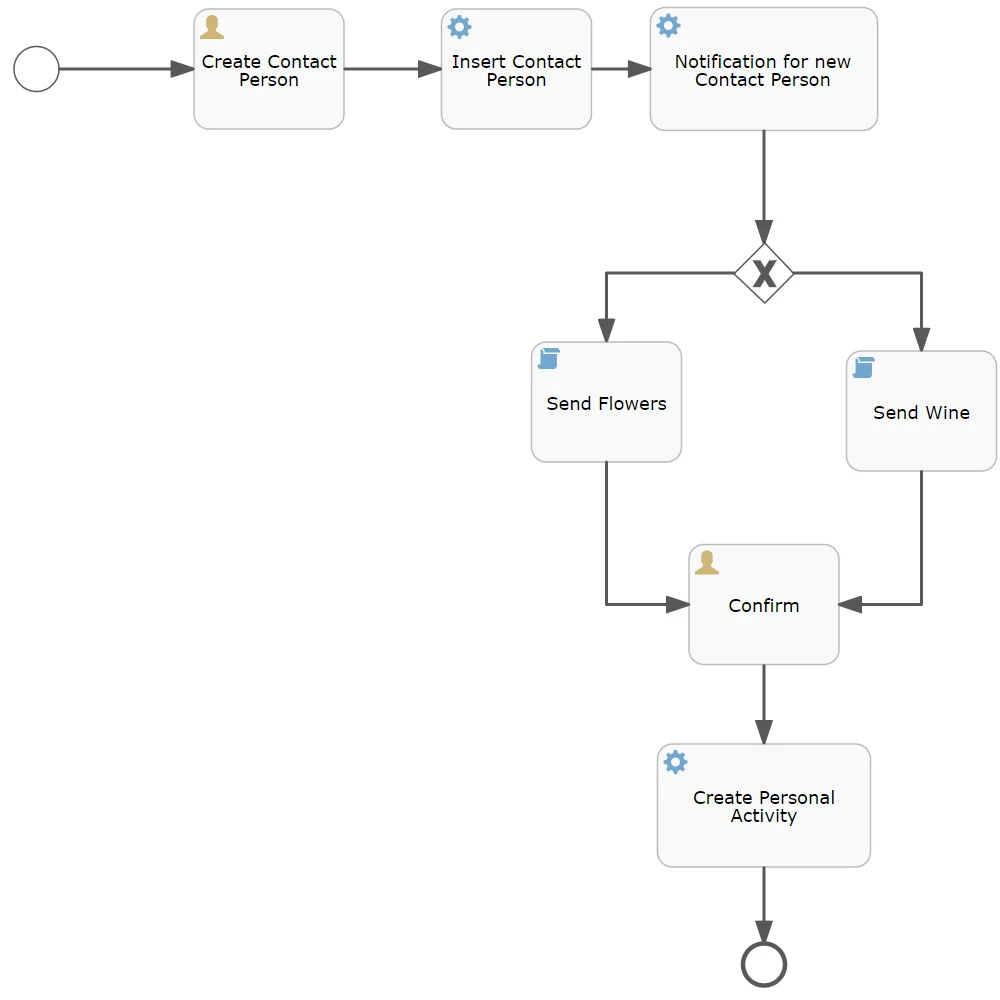
Currently there are no translations for the different fields in the workflow modeler.
Step 1: Open and create the Workflow
Start the Flowable Modeler before the ADITO server and open the ADITO client. Like mentioned before go to the context "Workflowdefinition" and click "create a new model".
A dialog opens. Enter the following values:
| Field | Value |
|---|---|
| Model name | Create Contact Person |
| Model key | createContactPerson |
Step 2: Create an 'User Task'
An 'User-Task' is a task where a human performer performs the action that completes the task. We want the user to fill the information for the person that gets created.
On the left side of the canvas there are all folders with the corresponding content. Open 'Activities' and drag an 'User Task' in.
Click on the User Task. A new set of properties appears below the canvas. Configure the task as follows:
| Property | Value |
|---|---|
| Name | Create Contact Person |
| Assignment type | Identity store |
| Assignment | Assigned to single user |
| Search | Tim Admin. Select the user to assign the task. |
If this user is unavailable, assign the task to a group such as support.
Add the following four form-property data sets:
| ID | Name | Type | Required | Variable |
|---|---|---|---|---|
salutation | Salutation | String | Yes | |
firstname | Firstname | String | Yes | |
lastname | Lastname | String | Yes | |
gender | Gender | Enum | Yes | gender |
For the gender property, add the following enum values:
| ID | Name |
|---|---|
f | Female |
m | Male |
g | Divers |
The type "Enum" will expand the fields and you can enter lists, which the user can select.
The properties of the "Form properties" are located in an JSON-object. This will later be used to create our person and help identify the Sequence Flow for the gender-oriented present in task 2.
Connect the events by holding the Sequence Flow from the 'Start-Event' to the 'User-Task'.
Step 3: Create a 'Service Task'
A service task performs a 'technical' task. It triggers as soon as its completed the previous step. This is usually a ADITO process which can be found in the 'process' folder under 'workflow'. This is where the most customizing will happen if different tasks are defined.
Repeat these steps with a Service Task and configure the following values:
| Property | Value |
|---|---|
| Name | Notification for new Contact Person |
| ID | createNotficationPerson |
| jDito process | Create notification |
Configure these parameters for the jDito process:
| Parameter | Value |
|---|---|
| Caption | New contact person has been created |
| Description | A new contact person has been created |
| User | Tim Admin |
Connect from the 'User-Task' to 'Service-Task' with the arrow.
Step 4: End the Workflow
An 'End Event' signals the end of a Workflow. Therefore if this point is reached the Workflow will be completed.
Add an 'End Event' and connect the Sequence Flow from the previous task to this.
Step 5: Save your progress
Save the model (upper left corner) and press 'Save and deploy'. The rest-webservice will deploy the changes to ADITO and will redirect you back to your ADITO client.
Step 6: Get your Workflow in ADITO
Now go in the created Workflow and click on the tab to Usage (Verwendung) and press the edit button (pencil) and select company.
After this you can open the company filter view and click once on a company, to open the preview. Click on the three dots and open the action 'start workflow' ('Workflow starten') and a new preview appears. Select your workflow process and press save again.
-
Move to your home dashboard and add a new dashlet ('My own Workflow Tasks' or 'Meine Workflow Aufgaben').
-
Now there should be a task with your given title.
-
Click on this task and confirm your task.
-
A new preview opens and fill in your data (later this data will be the new employee information)
-
As soon as you save your data a notification should pop up.