Task 2: Create the Workflow
After the basics, we create the person with the fields we already implemented. Before the welcome present can be sent the gender must be validated. Next a person of a group confirms the shipping and the activity will be created.
Step 1: Adding a Workflow_process
To continue the workflow, a new process has to be added to the code. Therefore we need to implement the logic the task has to perform.
-
Open the ADITO Designer and create a new process and call it "SetPrimaryContact_workflowService"
-
Set the property 'title' to "Set Primary Contact" because this title will be shown in the Flowable Modeler after everything is done.
-
Select "workflow" for the property 'variants'
-
Set "Data_alias" for the property 'alias'
-
Copy this code to the property 'serviceTaskParameterProcess' under "Workflow engine":
import("Workflow_lib");
import("system.result");

result.object([
    new WorkflowServiceTaskParameter("contactPosition", "Position", WorkflowServiceTaskParameter.STRING())
]);
The result set will be the parameters that can be selected in the Flowable Modeler. In this example you can enter a string for the value.
And add this code to your process:
import("Sql_lib");
import("system.result");
import("system.workflow");
import("system.datetime");
import("KeywordRegistry_basic");
import("system.db");
import("system.util");
import("system.vars");

var variables = JSON.parse(vars.get("$local.value"));

var contact_orgID = variables.targetId;
var target = variables.targetContext;
var firstname = variables.firstname;
var lastname = variables.lastname;
var gender = variables.gender;
var position = variables.contactPosition;
var salutation = variables.salutation;
var contactID = util.getNewUUID();
var personID = util.getNewUUID();

var orgID = newSelect("CONTACT.ORGANISATION_ID")
.from("CONTACT")
.where("CONTACT.CONTACTID", contact_orgID)
.and("PERSON_ID IS NULL")
.cell();

var personObj = {
    "PERSONID": personID,
    "FIRSTNAME": firstname,
    "LASTNAME":  lastname,
    "GENDER": gender,
    "SALUTATION": salutation,
    "USER_NEW": "Admin",
    "DATE_NEW": datetime.date()
}

new SqlBuilder().insertFields(personObj, "PERSON");

var contactObj = {
    "STATUS": $KeywordRegistry.contactStatus$active(),
    "ISOLANGUAGE": "deu",
    "ORGANISATION_ID":  orgID,
    "PERSON_ID": personID,
    "CONTACTID": contactID,
    "CONTACTPOSITION": position,
    "USER_NEW" : "Admin",
    "DATE_NEW": datetime.date()
}

new SqlBuilder().insertFields(contactObj, "CONTACT");

var processVariables = {
    "contactID": contactID,
    "personID" : personID
}

result.object(processVariables);
Deploy the project.
Step 2: Use the new process
Now the new process will be added via a 'Service-Task'. Go back to the Flowable Modeler and open the process with the 'Visual Editor'. Delete the 'End-Event' and the connection towards it.
Drag a new 'Service-Task' in and place it in between the 'User-Task' and the 'Service-Task'. Remove the connection between them and configure the following values:
| Property | Value |
|---|---|
| Name | Insert Contact Person |
| ID | insertContactPerson |
| jDito process | Set Primary Contact |
Configure the following parameter for the jDito process:
| Parameter | Value |
|---|---|
| Position | Contact Person |
Connect it again between the existing two tasks with the flow towards the end.
Step 3: Setting up a Gateway
As a decision is approaching a 'gateway' has to be inserted. Gateways are used to control how the process flows through Sequence Flows as they converge and diverge within a process.
This is how it can be used (This just a example, not our process):
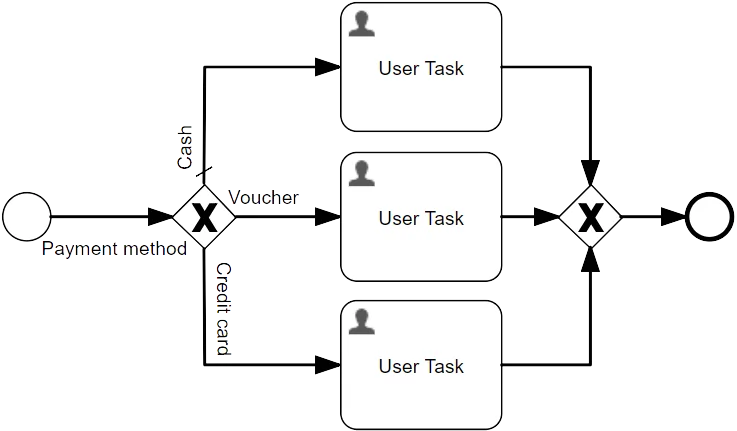
Drag an 'Exclusive gateway' in and connect it from the 'Service-Task' to the 'Gateway'.
Step 4: Using Script-Tasks
To select the appropriate present, which will be sent to the new employee, 2 'Script-Tasks' have to be entered.
Drag two 'Script-Tasks' into the canvas and configure them as follows:
| Property | Send Flowers | Send Wine |
|---|---|---|
| Name | Send Flowers | Send Wine |
| Script format | javascript | javascript |
| Script | execution.setVariable("present", "Flowers"); | execution.setVariable("present", "Wine"); |
Connect these 2 'Script-Tasks' from the 'Gateway' to them.
Click on the Sequence Flow between 'Script-Task' "Send Flowers" and the 'Gateway' and fill the property 'Flow condition' with
${gender == "f"}
Click on the Flow direction between 'Script-Task' "Send Wine" and the 'Gateway' and fill the property 'Flow condition' with
${gender != "f"}
Step 5: Simple User Task
Now we want to confirm the shipping of the welcome present. A simple User Task will be added with no Form Properties. Only people with the role "Marketing" & "Human Resources" can confirm this task. If one does complete this task, everyone else won’t see it anymore. Drag a 'User-Task' into the canvas and configure the following values:
| Property | Value |
|---|---|
| Name | Confirm |
| Assignment type | Identity store |
| Assignment | Candidate groups |
| Search | Marketing & Human Resources |
Connect the 2 'Script-Tasks' to this 'User-Task'.
Step 6: Adding activity Statement
Again we need a new process to achieve our goal to create this Workflow. Open your ADITO Designer and create a new process called "CreatePresentActivity_workflowService". Like before set the property 'title' to "Create Present Activity" and select "workflow" for the property 'variants' and "Data_alias" for the property 'alias'
Copy this code to the property 'serviceTaskParameterProcess' under "Workflow engine":
import("KeywordData_lib");
import("KeywordRegistry_basic");
import("Workflow_lib");
import("system.result");

result.object([
    new WorkflowServiceTaskParameter("activityDirection", "Direction", WorkflowServiceTaskParameter.ENUM(), _getKeywords($KeywordRegistry.activityDirection())),
    new WorkflowServiceTaskParameter("activityCategory", "Category", WorkflowServiceTaskParameter.ENUM(), _getKeywords($KeywordRegistry.activityCategory())),
    new WorkflowServiceTaskParameter("activityTitle", "Title", WorkflowServiceTaskParameter.STRING())
]);

function _getKeywords (pContainer)
{
    return KeywordData.getSimpleData(pContainer).map(function (item) {return {id : item[0], name : item[1]};});
}
Like the last parameter process, this object will display all parameters and the corresponding values in the Flowable Modeler.
You also have to add this code to your process:
import("system.tools");
import("Employee_lib");
import("system.result");
import("ActivityTask_lib");
import("system.vars");

var variables = JSON.parse(vars.get("$local.value"));

var targetID = variables.targetId;
var target = variables.targetContext;
var category = variables.activityCategory;
var direction = variables.activityDirection;
var name = variables.firstname + " " + variables.lastname;
var contactID = variables.contactID

var obj = {
    responsibleContactId : tools.getUserByAttribute(tools.NAME, [variables.USER_ID], tools.PROFILE_DEFAULT)[tools.PARAMS][tools.CONTACTID],
    directionKeywordId : direction,
    categoryKeywordId : category,
    content : name + " has received the present " + variables.present,
    subject : variables.activityTitle + " " + name
}

var links = [[target, targetID], ["Person", contactID]];
var activity = ActivityUtils.insertNewActivity(obj, links);
This process will do almost the same as the existing 'CreateActivity_workflowService' but here you can tweak a few more settings that are necessary for this example.
Deploy the project. The rest-webservices will directly intergrate this new added process to the selection.
Step 7: Using the activity process
After deploying the new process, add a new 'Service-Task' to the canvas and use "Create Present Activity" for the activity. Configure the following values:
| Property | Value |
|---|---|
| ID | createActivity |
| Name | Create Personal Activity |
| jDito process | Create Present Activity |
Configure these parameters for the jDito process:
| Parameter | Value |
|---|---|
| Direction | ausgehend (outgoing) |
| Category | Besuch (visit) |
| Title | Present to |
and again connect it via a Sequence Flow with the last task.
Step 8: Adding End Event
Connect to a new 'End Event' like in the first task.
Step 9: Testing and Summary
And redo step 5 from task 1 and try to create a new person again.
After you filled in your data for the new employee, the person will be created and a notification will appear. After this you will get asked if you want to send the present. When you accept it, a new activity will be created with the right information and will be linked with the company and the corresponding person.